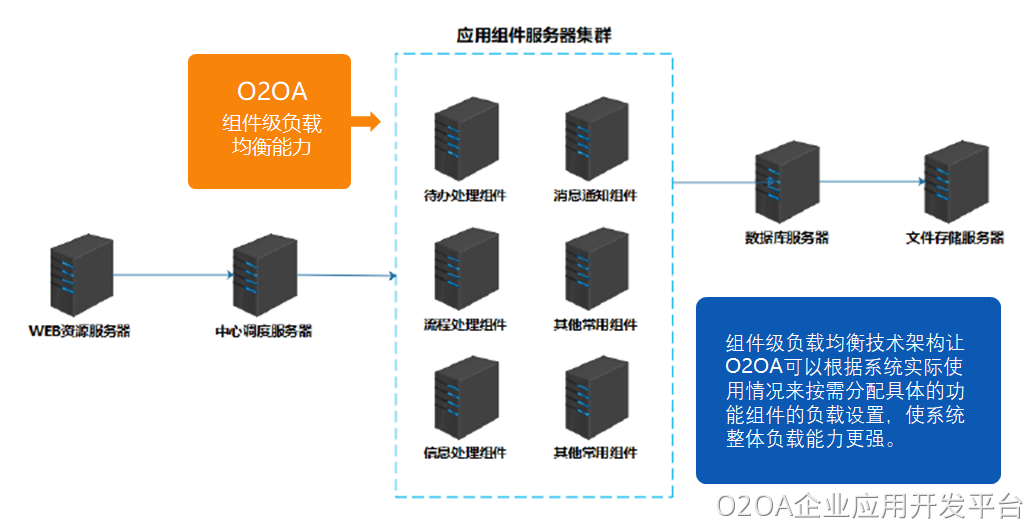
扩展依据配置文件实现,可以对以下服务器进行扩展:
Web服务器
Application服务器
Storage服务器
Data服务器
Center服务器
主机信息
主机:192.168.0.1
主机:192.168.0.2
集群需求
192.168.0.1:应用服务器,文件存储服务器,数据库服务器,中心服务器,WEB服务器
192.168.0.2:应用服务器,文件存储服务器,数据库服务器
配置步骤
一、配置节点标识
1、在主机192.168.0.1的o2server/local目录中修改或者新增文件node.cfg,修改内容为主机的域名或者IP(如果以域名访问,则内容为域名,如demo.o2oa.net);
主机192.168.0.1的节点标识文件配置
192.168.0.1 |
2、在主机192.168.0.2的o2server/local目录中修改或者新增文件node.cfg,修改内容为主机的域名或者IP(如果以域名访问,则内容为域名,如demo.o2oa.net);
主机192.168.0.2的节点标识文件配置
192.168.0.2 |
二、准备配置文件
双机集群需要准备两份服务器IP命名的配置文件(如果以域名访问,则需要以域名方式对文件命名如node_demo.o2oa.net.json):
1、从任一主机的o2server/configSample目录中copy文件node_127.0.0.1.json到其他目录,命令为node_192.168.0.1.json
2、同步骤1,从任一主机的o2server/configSample目录中copy文件node_127.0.0.1.json到其他目录,命令为node_192.168.0.2.json
3、修改node_192.168.0.1.json,每台都有center,通过center的order来区分,配置order为0,配置文件如下:
{
  "enable": true,
  "order": 0,
  "application": {
    "enable": true,
    ......
  },
  "web": {
    "enable": true,
    ......
  },
  "data": {
    "enable": true,
    ......
  },
  "storage": {
    "enable": true,
    ......
  },
  ......
}3、修改node_192.168.0.2.json,配置center的order顺序为1,并且关闭该服务器的WEB服务器,配置文件如下:
{
  "enable": true,
  "order": 1,
  "application": {
    "enable": true,
    ......
  },
  "web": {
    "enable": false,
    "sslEnable": false,
    "proxyHost": "",
    ......
  },
  "data": {
    "enable": true,
    ......
  },
  "storage": {
    "enable": true,
    ......
  },
  ......
}
其中application为应用服务器配置,在配置中的includes和excludes可以对该应用服务器包含的应用或者排除的应用进行编辑,以实现非对称集群配置
{
  "enable": true,
  "application": {
    "enable": true,
    "port": 20020.0,
    "sslEnable": false,
    "proxyHost": "",
    "proxyPort": 20020.0,
    "redeploy": true,
    "scanInterval": 0.0,
    "includes": [x_file_assemble_control],    #这里填入需要启动的服务
    "excludes": [],                           #这里填写不需要启动(排除)的服务
    "weights": [],
    "###includes": "承载的应用,在集群环境下可以选择仅承载部分应用以降低服务器负载,可以使用*作为通配符.###",
    "###excludes": "选择不承载的应用,和includes的值配合使用可以选择或者排除承载的应用,可以使用*作为通配符.###",
    "###weights": "设置应用的权重,在集群环境中,一个应用可以部署多个实例提供负载均衡.通过合计占比来分配应用占比.###"
  },
  ......
}
4、将配置文件node_192.168.0.1.json和node_192.168.0.2.json,同时放到两台服务器的o2server/config目录内.
三、启动服务器
1、启动服务器 192.168.0.1
服务器192.168.0.1应该启动全部服务,所以在执行start_windows.bat或者./start_linux.sh后,直接键入start启动服务器即可。
2、启动服务器 192.168.0.2
服务器192.168.0.2只需要启动部分服务,所以需要依次键入命令启动相应的服务器:
1)启动数据库服务器
键入命令:start data
2)启动文件存储服务器
键入命令:start storage
3)启动应用服务器
注意:192.168.0.2启动之前192.168.0.1的中心服务器一定要先启动完成,否则应用服务器启动会报错。
键入命令:start application
备注:应用列表说明
应用名称 | 说明 |
x_attendance_assemble_control | 考勤管理 |
x_bbs_assemble_control | 企业社区 |
x_calendar_assemble_control | 日程管理 |
x_cms_assemble_control | 内容管理,信息管理 |
x_collaboration_assemble_websocket | websocket消息服务 |
x_collaboration_service_message | 消息服务 |
x_component_assemble_control | 组件服务 |
x_file_assemble_control | 云文件,文件存储 |
x_general_assemble_control | 通用服务:省市县数据 |
x_hotpic_assemble_control | 热点新闻服务:推送显示在移动APP首页 |
x_meeting_assemble_control | 会议管理 |
x_message_assemble_communicate | 消息管理 |
x_mind_assemble_control | 脑图工具 |
x_okr_assemble_control | 执行力管理 |
x_organization_assemble_authentication | 组织管理 |
x_organization_assemble_control | 组织管理 |
x_organization_assemble_express | 组织管理 |
x_organization_assemble_personal | 组织管理 |
x_portal_assemble_designer | 门户管理 |
x_portal_assemble_surface | 门户管理 |
x_processplatform_assemble_bam | 流程管理 |
x_processplatform_assemble_designer | 流程管理 |
x_processplatform_assemble_surface | 流程管理 |
x_processplatform_service_processing | 流程管理 |
x_program_center | 中心服务器 |
x_query_assemble_designer | 数据中心 |
x_query_assemble_surface | 数据中心 |
x_query_service_processing | 数据中心 |
若有收获,就点个赞吧


 浙公网安备 33010602009829号